tc 命令详解
A B C D E F G H I J K L M N O P Q R S T U V W X Y Z
tc 命令安装:
-bash/zsh: tc: command not found

#Debian
apt-get install iproute2

#Ubuntu
apt-get install iproute2

#Alpine
apk add iproute2

#Arch Linux
pacman -S iproute2

#Kali Linux
apt-get install iproute2

#CentOS
yum install iproute-tc

#Fedora
dnf install iproute-tc

#Raspbian
apt-get install iproute2

#Docker
docker run cmd.cat/tc tc
tc 命令补充说明:
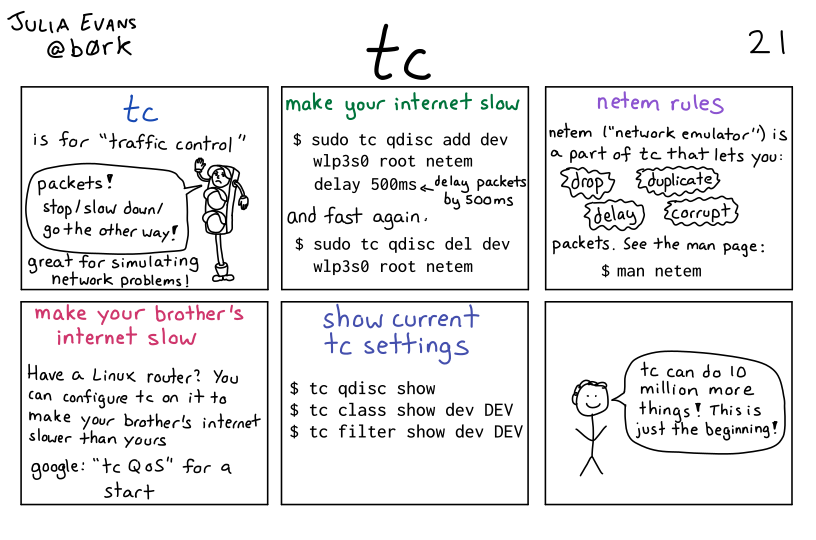
tc
tc 用于在 Linux 内核中配置流量控制。tc 是 Linux 自带的模块,一般情况下不需要另行安装,可以用 man tc 查看 tc 相关命令细节,要求内核 2.4.18 以上。
tc 命令原理:
Linux 中的 QoS 分为入口 (Ingress) 部分和出口 (Egress) 部分,入口部分主要用于进行入口流量限速 (Policing),出口部分主要用于队列调度 (Queuing Scheduling)。大多数排队规则 (QDisc) 都是用于输出方向的,输入方向只有一个排队规则,即 Ingressqdisc。
Ingressqdisc 本身的功能很有限,输入方向只有一个排队规则,即 IngressqDisc(因为没有缓存只能实现流量的 Drop)但可用于重定向 Incomingpackets。通过 IngressqDisc 把输入方向的数据包重定向到虚拟设备 ifb,而 ifb 的输出方向可以配置多种 QDisc,就可以达到对输入方向的流量做队列调度的目的。
tc 命令语法:
tc [ OPTIONS ] qdisc [ add | change | replace | link | delete ]
     dev DEV [ parent qdisc-id | root ] [ handle qdisc-id ] [
     ingress_block BLOCK_INDEX ] [ egress_block BLOCK_INDEX ] qdisc [
     qdisc specific parameters ]

tc [ OPTIONS ] class [ add | change | replace | delete ] dev DEV
parent qdisc-id [ classid class-id ] qdisc [ qdisc specific
parameters ]

tc [ OPTIONS ] filter [ add | change | replace | delete | get ]
dev DEV [ parent qdisc-id | root ] [ handle filter-id ] protocol
protocol prio priority filtertype [ filtertype specific
parameters ] flowid flow-id

tc [ OPTIONS ] filter [ add | change | replace | delete | get ]
block BLOCK_INDEX [ handle filter-id ] protocol protocol prio
priority filtertype [ filtertype specific parameters ] flowid
flow-id

tc [ OPTIONS ] chain [ add | delete | get ] dev DEV [ parent
qdisc-id | root ] filtertype [ filtertype specific parameters ]

tc [ OPTIONS ] chain [ add | delete | get ] block BLOCK_INDEX
filtertype [ filtertype specific parameters ]

tc [ OPTIONS ] [ FORMAT ] qdisc { show | list } [ dev DEV ] [
root | ingress | handle QHANDLE | parent CLASSID ] [ invisible ]

tc [ OPTIONS ] [ FORMAT ] class show dev DEV

tc [ OPTIONS ] filter show dev DEV

tc [ OPTIONS ] filter show block BLOCK_INDEX

tc [ OPTIONS ] chain show dev DEV

tc [ OPTIONS ] chain show block BLOCK_INDEX

tc [ OPTIONS ] monitor [ file FILENAME ]
tc 命令选项:
-b, -b filename, -batch, -batch filename
              read commands from provided file or standard input and
              invoke them.  First failure will cause termination of tc.

-force don't terminate tc on errors in batch mode.  If there were
       any errors during execution of the commands, the
       application return code will be non zero.

-o, -oneline
       output each record on a single line, replacing line feeds
       with the '\' character. This is convenient when you want
       to count records with wc(1) or to grep(1) the output.

-n, -net, -netns <NETNS>
       switches tc to the specified network namespace NETNS.
       Actually it just simplifies executing of:

       ip netns exec NETNS tc [ OPTIONS ] OBJECT { COMMAND | help
       }

       to

       tc -n[etns] NETNS [ OPTIONS ] OBJECT { COMMAND | help }

-N, -Numeric
       Print the number of protocol, scope, dsfield, etc directly
       instead of converting it to human readable name.

-cf, -conf <FILENAME>
       specifies path to the config file. This option is used in
       conjunction with other options (e.g.  -nm).

-t, -timestamp
       When tc monitor runs, print timestamp before the event
       message in format:
          Timestamp: <Day> <Month> <DD> <hh:mm:ss> <YYYY> <usecs>
       usec

-ts, -tshort
       When tc monitor runs, prints short timestamp before the
       event message in format:
          [<YYYY>-<MM>-<DD>T<hh:mm:ss>.<ms>]
tc 命令实例:
tc 查看包 drop 情况:
tc -s -d qd
tc 列出目前所有的 Network Interface 的设定:
$ tc qdisc ls

qdisc noqueue 0: dev lo root refcnt 2
qdisc pfifo_fast 0: dev enp0s5 root refcnt 2 bands 3 priomap  1 2 2 2 1 2 0 0 1 1 1 1 1 1 1 1composer require user/package_name
tc-prio 是预设的队列规则,如果有绑定新的队列规则会直接覆盖过去。预设prio 会有三个band,而priomap 则表示对应IP 封包中的4bits TOS 栏位,将封包透过该band 发送。
需注意 enp0s5 是我自己的 Network Interface,记得替换成自己装置上的 Network Interface
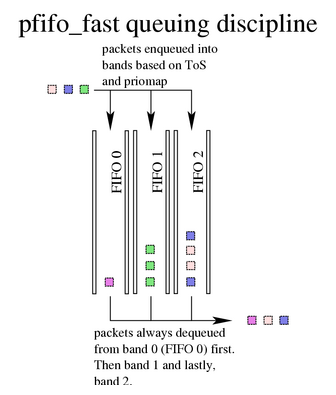
tc 预设将所有的流量导向 band 2,为了避免其他封包被影响,先将所有的封包都走band 2(指令计数从0开始)
$ sudo tc qdisc add dev enp0s5 root handle 1: prio bands 10 priomap 2 2 2 2 2 2 2 2 2 2 2 2 2 2 2 2

-------------------------------
handle 1: 指的是绑定到qdisc 的root
bands 10: 可以创建10组band
tc 设定封包延迟:
$ sudo tc qdisc add dev enp0s5 parent 1:1 handle 10: netem delay 100ms 10ms

---------------------
1. netem 是 tc 的工具之一,可用来增加延迟、掉封包、重复封包等模拟工具,netem delay 100ms 10ms表示每个封包延迟100ms(+- 10ms)
2. parent 1:1 表示在class id 1 底下,建立一个id 为1的子节点,因为当前的队列没有多层次的class设计,所以1:1 就对应到band 0
3. handle 10: 表示创建一个class id 为10 的节点
tc 带宽限制,测试限制aws s3 上传的带宽:
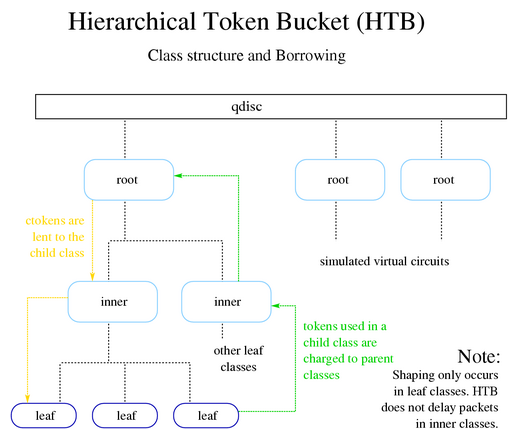
删除旧的qdisc 设定
$ sudo tc qdisc del dev enp0s5 root

建立 htb
$ sudo tc qdisc add dev enp0s5 root handle 1:0 htb

加入bandwidth 限制
$ sudo tc class add dev enp0s5 parent 1: classid 1:1 htb rate 100kbps ceil 100kbps
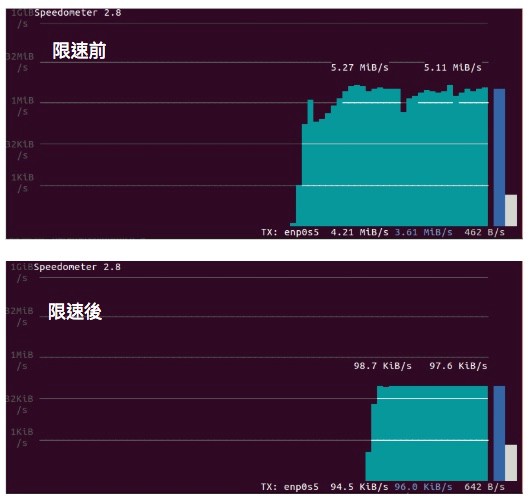
比对 s3 上传的前后,发现上传速度,被限制在 100 kbps。如果单纯想要限制上传速度,也可以用 tc-tbf,但 htb 优点是用层状架构限速,leaf 会受到 root 的限制,例如分配一条带宽 10 Mbps,可以在之下分配 4 Mbps 给某网域 6 Mbps 给其他网域等。
tc 扩展阅读:
- 云平台 Linux 服务器问题场景分析思路及工具箱
- tc 命令详解
- pidstat 命令
- iostat 命令
- dstat 命令
- vmstat 命令
- mpstat 命令
- dstat 命令
- perf 命令
- nload 命令
- speedometer 命令详解
- nethogs 命令
CommandNotFound ⚡️ 坑否 - 其他频道扩展阅读:
tc 命令评论
-
ab 命令
apachectl 命令
arp 命令
arp-scan 命令
arpd 命令
arping 命令
arptables 命令
arpwatch 命令
axel 命令
az 命令
bmon 命令
bye 命令
cu 命令
curl 命令
dhclient 命令
dhcpd 命令
dhcrelay 命令
dig 命令
dnsdomainname 命令
domainname 命令
drill 命令
ethtool 命令
fping 命令
gdrive 命令
host 命令
http 命令
ifcfg 命令
ifconfig 命令
ifdown 命令
ifstat 命令
ifup 命令
ip 命令
iperf、iperf3 命令
iptraf、iptraf-ng 命令
lsof 命令
mtr 命令
nc 命令
nethogs 命令
netstat 命令
nisdomainname 命令
nload 命令
nmap 命令
nscd 命令
nslookup 命令
ping 命令
pssh 命令
rcp 命令
route 命令
rsstail 命令
rsync 命令
scp 命令
sendmail 命令
speedometer 命令
ss 命令
ssh 命令
sslscan 命令
sysdig 命令
tc 命令
tcpdump 命令
tcpflow 命令
tcping 命令
telnet 命令
traceroute 命令
ufw 命令
vue 命令
w3m 命令
wget 命令
whois 命令
wrk 命令
wuzz 命令
ypdomainname 命令
yppasswd 命令